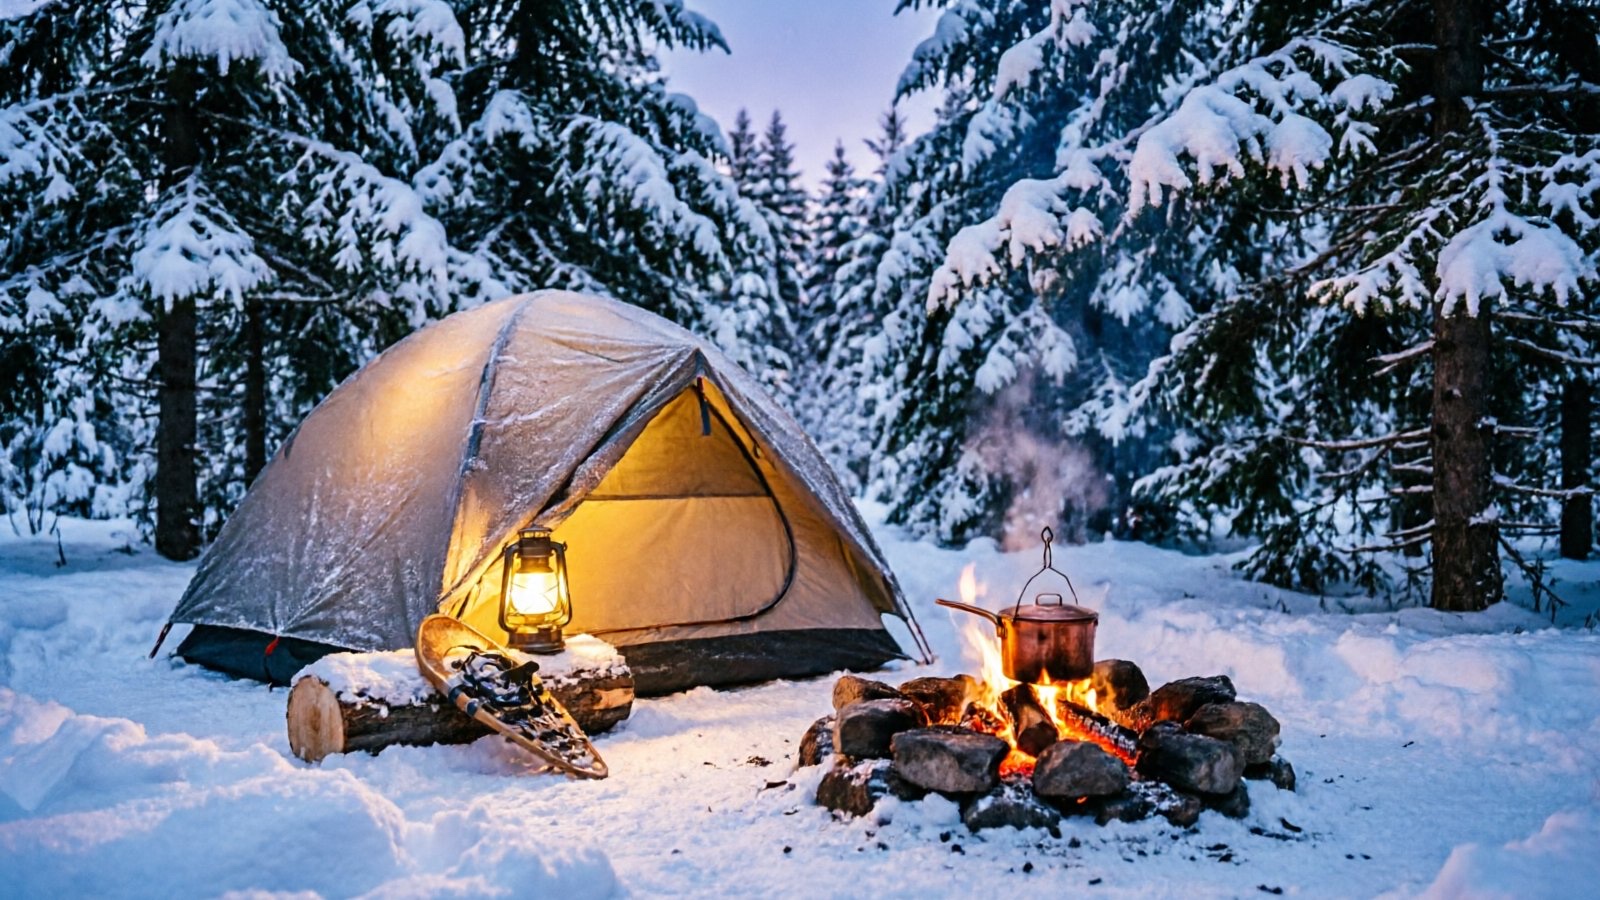
Camping in Winter: Complete Guide to Cold Weather Camping
Everything you need to camp in winter safely. From cold weather gear and sleeping bags to staying warm at night, this complete guide has you...
Camping in winter transforms familiar landscapes into something entirely different. Frozen lakes, snow-draped trees, and silence you won’t find in any other season. But cold weather camping demands more planning and better gear than a summer trip. This guide covers the essentials: what to bring, how to stay warm, and how to avoid the mistakes that send people home early.
Why Camping in Winter Is Worth It
Camping in winter means empty campgrounds. No reservations needed, no neighbor’s music at midnight, no mosquitoes. The trade-off is that you need to work harder for comfort, but the payoff is significant.
Practical advantages:
- Campsite fees drop or disappear entirely at many state and national parks between November and March
- No bugs means no DEET, no head net, no tent mesh needed
- Fire regulations are often relaxed in winter, making campfires easier and more enjoyable
- Wildlife viewing changes completely — animal tracks in snow tell a story you can’t see in summer
Health benefits: Cold exposure triggers a measurable increase in brown fat activity (the metabolically active fat that generates heat), which some studies have linked to improved insulin sensitivity [National Institutes of Health, 2014]. The physical effort of setting up camp in snow, hiking with a heavier pack, and managing gear also burns significantly more calories than summer camping — often 30-50% more.
Mentally, the quiet is unmatched. A winter campsite at dawn, with frost coating everything and steam rising from your coffee, is the kind of experience that makes the extra packing worth it.
Essential Gear for Camping in Winter
Winter camping gear revolves around one principle: insulation from the ground and protection from wind. You can always add layers if you’re cold during the day, but a poor sleep system at night is unrecoverable.
Your sleep system and shelter are the two items where cutting corners costs you the most. A summer sleeping bag in 20°F weather isn’t uncomfortable — it’s dangerous. A 3-season tent in a snowstorm isn’t just cold — it can collapse.
The clothing system matters too, but it’s more forgiving because you can adjust layers throughout the day. The sections below break down each category in detail.
How to Choose the Right Sleeping Bag for Winter
Temperature ratings follow the EN/ISO 23537 standard used by most manufacturers since 2005. This standard defines three ratings:
- Comfort: the temperature at which a cold sleeper (standard woman) can sleep comfortably
- Lower Limit: the temperature at which a warm sleeper (standard man) can sleep comfortably
- Extreme: the minimum survival temperature — not a comfortable sleeping temperature
For winter camping, choose a bag rated 10-15°F below the lowest temperature you expect to encounter. If the forecast calls for 15°F, get a bag rated to 0°F or 5°F. Temperature ratings are optimistic in real-world conditions because they don’t account for wind chill, humidity, or individual metabolic differences.
Insulation types:
| Feature | Down (Goose/Duck) | Synthetic (Polyester) |
|---|---|---|
| Warmth-to-weight | Superior — lighter for same warmth | Heavier for same warmth |
| Pack size | Compresses small | Bulky, doesn’t compress well |
| Performance when wet | Loses most insulation value when wet | Retains ~80% insulation when wet |
| Drying time | Slow (12+ hours to air dry) | Fast (2-4 hours) |
| Durability | Lasts 10-15 years with care | Degrades after 3-5 seasons |
| Price | Higher ($200-600) | Lower ($80-250) |
For most winter campers who camp in dry cold (not wet coastal climates), down is the better choice. If you expect wet conditions — rain, sleet, or high humidity — synthetic insulation is safer because it retains warmth even when damp.
Fit matters. A mummy bag should fit snugly around you. Too much empty space means your body heats air that doesn’t insulate you. Look for a draft collar (an insulated tube around your neck/chin area) and a hood that cinches down to a small opening around your face.
For specific winter sleeping bag picks, the rioyalo 0°F Sleeping Bag handles temperatures down to 5°F and includes a compression sack for easy packing. The Coleman Heritage 10°F Flannel Sleeping Bag fits adults up to 6’7” with a machine-washable flannel liner that feels warmer against skin than nylon. On a tighter budget, the MEREZA 0°F Sleeping Bag includes a pillow and works for both adults and kids on 4-season trips.
For a deeper comparison of fill power, shell materials, and bag shapes, see our full sleeping bag guide.
Clothing System for Cold Weather Camping
The layering system isn’t complicated, but getting it wrong is the most common source of discomfort in winter camping. The goal is to trap warm air next to your body while letting moisture escape.
Base layer (next to skin): Merino wool or synthetic fabrics only. Cotton kills in cold weather — it absorbs sweat, holds moisture against your skin, and provides zero insulation when wet. Merino wool regulates temperature, resists odor (you can wear it 3-4 days), and still insulates when slightly damp. Weight: midweight (250 g/m²) works for most winter conditions down to 15°F.
Mid layer (insulation): Fleece jacket, synthetic insulated jacket, or down jacket. This is the layer you adjust most — add it when stopped, remove it when hiking. For sedentary winter camping (not backpacking), a hooded down jacket provides the most warmth for the least weight.
Shell layer (wind and water protection): A waterproof-breathable jacket (Gore-Tex or similar) blocks wind and sheds snow. Look for pit zips for ventilation — if you can’t vent heat while active, you’ll sweat through your base layer, which creates the moisture problem the shell was supposed to prevent.
Accessories people forget:
- Insulated gloves (two pairs: one thin for dexterity, one thick for warmth)
- Wool beanie — you lose 7-10% of body heat through your head
- Insulated boots with removable liners (let liners dry in your sleeping bag at night)
- Gaiters to keep snow out of your boots
- Neck gaiter or balaclava for wind protection
Setting Up Camp in Winter
Campsite selection in winter follows different rules than summer. Here’s the step-by-step process:
Step 1: Choose your site. Look for natural windbreaks — trees, rock formations, or terrain features. Avoid low ground where cold air pools (valley bottoms, depressions). In mountainous areas, camp on a ledge or bench above the valley floor. Avoid slopes directly below cornices or steep snowfields (avalanche terrain).
Step 2: Pack down a tent platform. If camping on snow, walk in circles wearing boots or snowshoes to compact a flat area at least 2 feet wider than your tent on each side. Let it set for 15-30 minutes before pitching — this creates a firm, level surface that won’t shift overnight.
Step 3: Pitch your tent and stake it down. In snow, standard stakes don’t hold. Use snow stakes (wider, longer aluminum or plastic), deadman anchors (a stuff sack filled with snow or a rock, buried horizontally with the cord tied to it), or ice screws if on hard snow/ice. Stake out all guylines — winter wind loads are much higher than summer.
Step 4: Create a cold air trench. Dig a small trench around the uphill side of your tent. Cold air flows downhill, and a 6-inch trench diverts it around rather than under your tent.
Step 5: Organize your vestibule. Keep anything that could freeze (water bottles, stove fuel) in the vestibule or inside the tent. Store boots in a stuff sack in the vestibule — not loose, or they’ll fill with snow.
For a general packing reference, see our car camping checklist.
How to Stay Warm When Camping in Winter
Cold nights are where winter camping either succeeds or fails. The principles are straightforward, but the details matter.
Before bed: Eat a high-calorie snack (cheese, jerky, chocolate, peanut butter — 300-500 calories). Your body needs fuel to generate heat overnight. Drink something warm but not so much that you’ll need to pee at 2 AM.
Hot water bottle trick: Fill a Nalgene bottle (not a hydration bladder — it could leak) with hot water, seal it tightly, and put it in your sleeping bag near your core or feet. This adds 2-3 hours of extra warmth as the water slowly cools. Wrap it in a sock or shirt to prevent direct skin contact.
What to wear in your sleeping bag: Dry base layers only. Not too many — overdressing causes sweating, and sweat freezes. Most people need one lightweight or midweight base layer top and bottom. Socks should be dry — bring a dedicated pair for sleeping, not the ones you wore all day. A wool beanie helps significantly.
Breathe outside the bag. Moisture from your breath accumulates in the insulation near your face, reducing its effectiveness night after night on multi-day trips. Keep your face outside the bag opening and cinch the hood around it.
> R-value measures thermal resistance — how well a material resists heat transfer. The higher the R-value, the more insulation it provides. For sleeping pads in winter camping, you need a combined R-value of at least 4.0 for temperatures down to 15°F, and 5.0+ for temperatures below 0°F. R-values are additive — a 2.5 foam pad stacked under a 3.0 inflatable pad gives you R-5.5.
Cooking in Cold Weather
Cooking in winter requires stove awareness. Not all stoves work in cold, and the difference matters.
Canister stoves (isobutane/propane mixtures) lose efficiency as temperature drops. At 20°F, output drops noticeably. At 0°F, canister pressure may be too low to cook at all. Workaround: keep canisters warm inside your jacket until use, or use a canister stand with an inverted canister that feeds liquid fuel.
Liquid fuel stoves (white gas) perform consistently in any temperature, including sub-zero. They’re heavier, louder, and require priming, but they’re reliable when canister stoves fail. For serious winter camping below 15°F, liquid fuel is the safer choice.
Melting snow for water: Never eat snow directly — it lowers your core temperature. Melt snow in a pot on your stove. Start with a small amount of liquid water in the pot (pour from a bottle or use ice, which melts faster than snow), then add snow gradually. Melting snow is slow — plan 20-30 minutes per liter.
Meal planning: Simple, high-calorie, and fast. Instant oatmeal with nuts and dried fruit for breakfast. Freeze-dried meals for dinner (they rehydrate with hot water in 10-15 minutes). Trail mix, cheese, salami, and chocolate for snacks throughout the day. Your body burns significantly more calories maintaining core temperature in cold weather — aim for 3,500-4,500 calories per day, compared to 2,500-3,000 in summer.
For stove selection guidance, see our best camping stove guide.
Safety Tips for Camping in Winter
> Hypothermia occurs when your core body temperature drops below 95°F (35°C). It progresses through three stages: mild (shivering, confusion, loss of fine motor skills), moderate (violent shivering stops, slurred speech, poor coordination, paradoxical undressing), and severe (unconsciousness, organ failure, death). Hypothermia can occur at temperatures well above freezing, especially in wet and windy conditions.
Recognize the warning signs in yourself and others:
- Uncontrollable shivering that suddenly stops (this is a bad sign — it means moderate hypothermia)
- Fumbling with zippers, dropping gear, difficulty with simple tasks
- Slurred speech or unusually quiet/confused behavior
- Skin that’s cold to the touch, especially on the chest, abdomen, and groin
Response: Get the person out of wind and wet conditions. Remove wet clothing. Insulate them from the ground. Apply heat to the core (armpits, groin, neck) — hot water bottles, warm rocks wrapped in cloth, or body-to-body contact. Give warm, sweet drinks if they’re conscious. Do not give alcohol. Do not rub extremities.
Frostbite prevention: Fingers, toes, ears, and nose are most vulnerable. Watch for white or grayish-yellow skin, numbness, and a waxy feeling. Prevention is simple: keep extremities dry, wear appropriate gloves and headwear, and check your fingers and toes periodically. If frostnip (mild frostbite) occurs, warm the area gradually with body heat — never rub it.
Avalanche awareness: If you’re camping in mountainous terrain with slopes steeper than 30°, take an avalanche awareness course before your trip. At minimum, carry a transceiver, probe, and shovel, and know how to use them. Check avalanche.org or your local avalanche forecast center before departure.
For comprehensive safety practices, see our camping safety tips.
Common Mistakes When Camping in Winter
These mistakes show up on every winter camping forum, every trip report, and every ranger’s list of rescue callouts.
| Mistake | Why It’s a Problem | Fix |
|---|---|---|
| ❌ Wearing cotton base layers | Cotton absorbs sweat and loses all insulating value when damp | Wear merino wool or synthetic base layers only |
| ❌ Sleeping in too many layers | More layers = more sweating = moisture in insulation = colder | One dry base layer is optimal for most conditions |
| ❌ Using a summer-rated sleeping bag | You won’t sleep, and in extreme cold, it’s dangerous | Get a bag rated 10-15°F below expected lows |
| ❌ Sleeping without a pad (or with a thin pad) | The ground conducts heat away from your body 5-10x faster than air | Use a pad with combined R-value of 4.0+ |
| ❌ Bringing a 3-season tent in snow | Poles can’t handle snow load, mesh lets wind through | Use a 4-season tent or reinforce your 3-season tent |
| ❌ Not checking weather before departure | Winter weather changes fast — storms arrive with little warning | Check forecasts 48 hours before and again before departure |
| ❌ Breathing inside your sleeping bag | Moisture accumulates in insulation, reducing effectiveness night after night | Keep your face outside the bag opening |
| ❌ Going to bed cold | Your sleeping bag reflects heat — it doesn’t generate it | Eat, drink something warm, do light exercise before getting in |
Camping in Winter with Kids
Winter camping with children is possible and can be incredibly rewarding, but the margin for error is smaller. Kids lose body heat faster than adults because of their higher surface-area-to-mass ratio, and they may not recognize or communicate that they’re cold.
Key adjustments:
- Bring 50% more clothing layers than you think they need, in a waterproof stuff sack
- Plan shorter outdoor time — 2-3 hours max in active play, then warm up inside the tent or a sheltered area
- Hand warmers (chemical or reusable) inside gloves and boots make a noticeable difference
- Hot drinks every 1-2 hours — hot chocolate, apple cider, or warm soup
- Set up the tent first, then let kids play. This gives them a warm refuge to return to
- Bring books, card games, or simple crafts for tent time
- Do a bedtime check: feel their fingers, toes, and belly (not forehead — skin can feel cold while core is warm)
- Consider a test run in the backyard before committing to a full trip
Kids as young as 4-5 can handle winter day trips and car camping. Backpacking in winter with kids is better suited for ages 8+ with previous camping experience.
For more on camping with children, see our camping with kids guide.
Camping in Winter: How to Handle Snow
Snow camping requires specific techniques beyond regular winter camping. The ground changes, water sources change, and navigation changes.
Snow shelters: In deep snow, you can dig a snow trench (a rectangular pit, covered with branches and a tarp, then buried with snow) for emergency shelter. A proper snow cave or quinzhee takes 2-3 hours to build and can maintain 30-35°F inside when it’s 0°F outside — warm enough to survive without a sleeping bag in an emergency. For planned trips, always bring a tent as your primary shelter and use snow construction as a skill-building activity, not your only option.
Keeping gear dry: This is the central challenge of snow camping. Use dry bags for everything inside your pack. Open packs carefully — snow falls into open bags easily and is hard to remove. Store wet items (boots, gaiters, wet shells) in the vestibule, not inside the sleeping area. At night, bring electronics, batteries, and water filters inside your sleeping bag — cold kills batteries and freezes filters.
Boot selection: For deep snow (12+ inches), insulated winter boots (like pac boots with removable felt liners) are essential. Gaiters keep snow out of your boot tops. For hiking on packed snow or trails, waterproof hiking boots with gaiters and wool socks work for temperatures down to about 10°F.
For handling other types of bad weather, see our camping in the rain guide.
Camping in Winter Checklist
Use this as your packing baseline. Adjust up or down based on your specific trip conditions and duration.
Shelter:
- 4-season tent (or 3-season with modifications)
- Snow stakes or deadman anchor materials
- Ground tarp or footprint
- Extra guylines and cord
Sleep System:
- Sleeping bag rated 10-15°F below expected low — the HiZYNICE 0°F Extra Large Sleeping Bag is sized for bigger campers with a zero-degree rating that handles genuine winter conditions
- Sleeping pad(s) with combined R-value of 4.0+
- Pillow (inflatable or stuff sack filled with clothes)
- Hot water bottle (Nalgene or similar wide-mouth bottle)
- Sleeping bag liner (optional, adds 5-10°F of warmth)
Clothing:
- 2 sets merino wool base layers (one for sleeping)
- Mid-weight fleece or insulated jacket
- Waterproof-breathable shell jacket and pants
- Insulated gloves (2 pairs)
- Wool beanie and neck gaiter
- Wool socks (3 pairs minimum)
- Insulated winter boots or waterproof hiking boots
- Gaiters
- Camp shoes (down booties or Crocs — for tent comfort)
Cooking:
- Cold-rated stove (liquid fuel or inverted canister)
- Extra fuel (winter cooking uses 30-50% more fuel)
- Pot with lid
- Utensils, mug, bowl
- Lighter and waterproof matches
- Water bottles (insulated) or thermos
- Trash bags (pack out everything)
Safety and Navigation:
- First aid kit (include blister care, pain relievers, emergency blanket)
- Headlamp with extra batteries (keep batteries warm)
- Fire-starting kit (ferro rod, cotton balls soaked in petroleum jelly, or waterproof matches)
- Emergency bivy sack
- Map and compass (batteries die, GPS doesn’t)
- Multi-tool or knife
- Sunscreen and lip balm (snow reflects UV intensely)
- Whistle
For fire-starting techniques in cold conditions, see how to build a campfire.
> 4-season tent refers to a tent designed for use in cold and snowy conditions. Key differences from 3-season tents: stronger pole structure (typically 4-5 poles vs 2-3) to handle snow accumulation on the roof, significantly reduced mesh paneling to block wind, a full-coverage rainfly that extends close to the ground, and a vestibule large enough for gear storage and cooking. They tend to be heavier (6-10 lbs vs 3-5 lbs) and have less ventilation, which can lead to condensation inside. For most winter campers staying at established campgrounds, a quality 4-season tent is the single most important gear investment.
Frequently Asked Questions
Is it safe to camp in winter?
Yes, winter camping is safe when properly prepared. The main risks are hypothermia and frostbite, both preventable with the right clothing, sleeping gear, and campsite selection. Always check weather forecasts and carry emergency supplies.
What temperature is too cold for camping?
Most campers stay comfortable down to 20°F (-7°C) with proper gear. Below 10°F (-12°C), you need expedition-grade equipment and experience. Beginners should start above freezing and work their way colder.
How do you stay warm in a tent in winter?
Use a 4-season tent, a sleeping bag rated 10-15°F below expected low, a closed-cell foam pad (R-value 4+), wear dry base layers to bed, and use a hot water bottle in your sleeping bag. Avoid cotton clothing and breathe outside your bag.
Can you use a regular tent for winter camping?
A 3-season tent works above freezing with mild conditions. Below freezing or in snow, a 4-season tent is strongly recommended — it has stronger poles to handle snow load, reduced mesh for wind protection, and a full-coverage rainfly.
What food is best for winter camping?
High-calorie, easy-to-prepare meals: instant oatmeal, freeze-dried meals, trail mix, cheese, jerky, and hot drinks. Your body burns more calories in cold weather, so plan 25-50% more food than summer camping. Bring a stove rated for cold weather use.